You are about to unlock your video editing potential with CapCut, a powerful and user-friendly tool perfect for creating stunning content. This guide will walk you through necessary features and techniques to help elevate your projects and deliver impressive results. From mastering transitions to leveraging text overlays, you’ll find all the tips you need to make your videos stand out. Get ready to transform your editing skills and produce professional-quality videos that will captivate your audience!
Key Takeaways:
- User Interface: Familiarize yourself with the intuitively laid out interface of CapCut to navigate through features seamlessly and enhance your video editing experience.
- Editing Tools: Explore the diverse range of editing tools such as transitions, text, and effects to elevate the quality of your videos and make them more engaging.
- Certain Features: Utilize advanced features like keyframing and audio editing to achieve professional-grade results and fine-tune your projects effortlessly.
Getting Started with CapCut
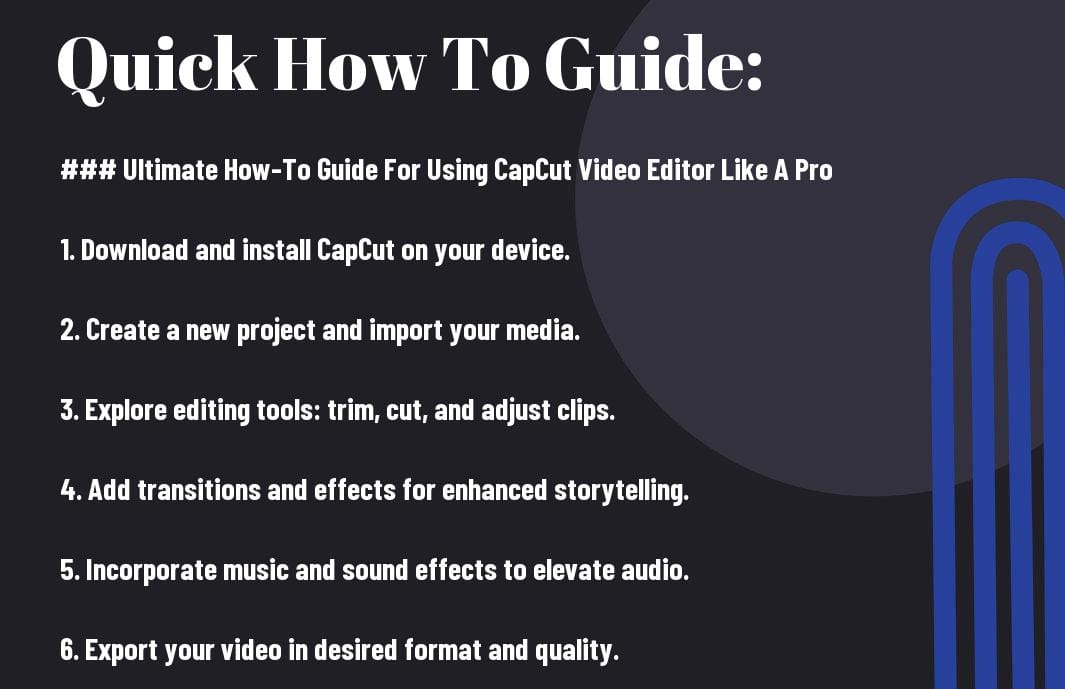
The first step in your journey to becoming a CapCut pro is to download and install the app on your device. This powerful video editing tool is compatible with both iOS and Android, providing you access to a wealth of features right from your smartphone.
Installing the App
Now that you’re eager to dive in, head over to the App Store or Google Play Store, search for “CapCut,” and tap on the install button. Once the installation is complete, open the app to begin your editing adventure.
Navigating the Interface
Some users may find the CapCut interface a bit overwhelming at first, but with some exploration, you’ll become familiar with its features. The main screen presents you with options to create a new project or access templates, while the toolbar at the bottom features tools for trimming, adding music, and applying effects.
CapCut offers an intuitive layout that allows you to efficiently access all editing features. The timeline displays your clips, making it easy to trim, split, and rearrange them. The preview window on the right helps you visualize your edits in real-time. Accessing the effects and transitions is a breeze, enabling you to enhance your video with just a few taps. As you explore, don’t hesitate to take advantage of the various options at your fingertips, helping you create stunning content effortlessly.
How to Import and Organize Your Clips
Some may overlook the importance of efficiently importing and organizing your clips, but doing so will significantly enhance your editing workflow. By keeping your media files structured, you’ll save time and reduce frustration while you work on your projects in CapCut. Follow these steps to streamline the process and focus on your creative vision.
Uploading Your Media
One of the first things you need to do is upload your media files into CapCut. To ensure a smooth uploading process, select the files you want from your device and simply drag and drop them into the media library. CapCut supports various video formats, making it easy for you to start creating.
Managing Your Project Files
Some users may find it challenging to keep their project files organized as they progress. By regularly sorting your clips into folders based on themes or projects, you’ll maintain a clearer overview of your assets. This organization can help prevent the confusion that often arises from a cluttered workspace.
A well-managed project file structure is imperative for achieving efficiency in your editing process. By creating subfolders for different types of media (like video clips, audio, images, etc.), you can quickly access the content you need. Furthermore, consider naming your files clearly and using descriptive labels. This practice not only aids in organization but also minimizes the risk of accidentally deleting important clips or wasting time searching for them.
Essential Editing Techniques
Despite the plethora of features CapCut offers, mastering imperative editing techniques will elevate your video projects and ensure a professional finish. You will find that honing these skills enhances your storytelling abilities, helps maintain viewer engagement, and ultimately results in a more polished final product that reflects your creative vision.
Cutting and Trimming Scenes
To effectively cut and trim your scenes, begin by identifying the sections of your footage that contribute the most to your narrative. By using the intuitive timeline controls in CapCut, you can select and remove unwanted segments, allowing you to focus your audience’s attention on the most impactful moments of your video.
Adding Text and Titles
Techniques for adding text and titles in your videos can significantly improve your storytelling by providing context and highlighting key messages. You can easily incorporate creative fonts, animations, and colors to make your text visually appealing, ensuring your audience remains engaged throughout your content.
This feature not only enhances the aesthetic of your videos but also allows you to convey your ideas more clearly. Utilize customizable fonts, transitions, and animations to bring your text to life and capture your viewer’s attention. Pay attention to the size and position of your titles, as well as their readability against the background; creating contrast is imperative for visibility. When done correctly, your titles can effectively guide viewers through your story, making them feel more connected to your content.
Enhancing Your Video with Effects
Now that you have your basic edits in place, it’s time to take your video to the next level by incorporating dynamic effects. CapCut offers a variety of options such as transitions, filters, and overlays that allow you to create a polished final product. You can experiment with these effects to enhance the storytelling aspect of your videos and captivate your audience’s attention.
Using Transitions for Smooth Edits
With transitions, you can make your cuts feel more natural and fluid. Choose from a wide range of transition styles that suit the tone of your video—from simple fades to elaborate animations. Apply these transitions between clips to maintain momentum and keep your viewers engaged, ensuring a seamless flow in your storytelling.
Applying Filters and Overlays
The right filters and overlays can dramatically change the mood of your video. They allow you to apply a cohesive look to all your clips, enhancing both visuals and atmosphere. Using CapCut’s extensive library of options, you can easily find filters that complement your story, whether you’re going for a vintage vibe or a modern, sleek appearance.
Enhancing your video with filters and overlays isn’t just about aesthetics; it’s also about creating a strong emotional connection with your audience. Make sure to choose filters that truly reflect the message you’re trying to convey. Overlays can add intriguing layers, but too many can clutter your video, so use them judiciously. Ultimately, your goal is to enhance your storytelling without compromising clarity and engagement, ensuring that your viewers remain focused on the visual narrative you’re presenting.
Tips for Adding Sound and Music
Once again, enhancing your videos with captivating sound and music can significantly elevate the overall viewer experience. Consider the following tips:
- Choose the right *music genre* to fit your video’s tone.
- Utilize *CapCut’s built-in audio library* for diverse options.
- Always pay attention to *royalty-free* soundtracks to avoid copyright issues.
- Experiment with the *timing of your audio* to complement key moments.
Perceiving sound and music as integral components of storytelling can greatly enhance your video’s impact.
Importing Audio Tracks
While adding audio tracks to your project, you can either select from CapCut’s extensive library or upload your own files. To import audio, simply tap on the audio menu, choose the desired source, and select your track. Ensure the file format is compatible for a smooth import process.
Adjusting Volume Levels and Effects
Audio adjustments play a significant role in achieving a polished final product. You can easily manage *volume levels* to ensure dialogue remains clear and unobtrusive. Applying *effects* such as fading in or out can create a seamless listening experience.
Adding multiple audio tracks can bring depth to your project, but it’s wise to adjust your *volume levels* to prevent overwhelming your background sound with dialogue or primary music. Use the *gain control* feature to balance each audio element effectively. With proper management of audio elements, your video will feel more *professional*, making it easier for viewers to engage with your content.
Factors to Consider for Final Touches
All your hard work in editing with CapCut can shine through when you focus on the final touches. Assess your video for color correction, transitions, and audio balance, ensuring everything flows perfectly together. Pay special attention to:
- Visual consistency
- Audio clarity
- Engaging thumbnails
Knowing these factors can elevate your project into something professional and polished.
Export Settings for Optimal Quality
If you want your finished project to look its best, choose the right export settings in CapCut. If you’re aiming for high resolution, select 1080p or 4K options based on your needs. Also, consider the frame rate and the codec that will serve your video best. Exporting with these settings maximizes quality and ensures your work appears stunning on any platform.
Sharing Your Video on Different Platforms
To effectively share your video, identify the platforms where your audience is most active. Each platform, like YouTube, Instagram, or TikTok, has its own ideal video specifications. Tailoring your video for each site’s unique requirements can significantly enhance engagement.
Plus, having your videos optimized for different platforms means you can effectively reach a wider audience. Ensure you maintain your brand identity across various social media, but be aware of specific video length limits and aspect ratios. This attention to detail can lead to improved viewer retention and increased interaction. Always keep in mind the best practices of each platform, as non-compliance can lead to poor performance of your content.
Final Words
The Ultimate How-To Guide for Using CapCut Video Editor Like A Pro has equipped you with the crucial skills and techniques to elevate your video editing game. By leveraging the features discussed, you can create engaging and professional-grade videos that stand out. Keep experimenting with the tools and functionalities available in CapCut to discover your unique editing style. With practice and creativity, you’ll become more confident in your abilities and produce videos that captivate your audience.